Showing posts with label how to. Show all posts

Sunday, September 4, 2011

Top Five Ways to Land Outdoor Recreation Jobs

So you decided you want an outdoor job? You have forsaken the cubicle. Good job, that's step one.

This guide will help you land any outdoor recreation industry job. These include, but are not limited to, guiding services, outfitters, experiential education, outdoor education, etc. Want to know how to become an outdoor guide?

Ready? Okay here's the five most important steps. GO!

Experience is the key to landing an outdoor job. 


Why don't I list "get a degree" first? Because in the outdoor industry, unlike many modern settings, it's possible to win a high-standing position using *gasp* skill. 


Narrow down your preferred fields of work I.E. whitewater guiding, and retail sales, and get experience doing them. 


If you're looking for an outdoor guide job, then make sure you have "expedition" experience in the field. Trips lasting more than a week are industry standard requirements on a resume.


Get Certified You went out and got some experience in the field. Good. Now it's time to get industry recognized.

Take courses from industry leading groups in your discipline. Here are a few industry-recognized associations:

ACA       (American Camp Association)
AMGA   (American Mountain Guides Association)
ACCT    (Association for Challenge Course Technology)
AORE    (Association of Outdoor Recreation and Education)

Don't forget, these associations can be invaluable in networking, not just certifications. I personally have landed a job through the ACA.

You're almost guaranteed to need a WFR (Wilderness First Responder) certification so you might as well get that done, too. Be aware; most outdoor companies do not recognize Red Cross certifications as valid. You'll need to go through NOLS WMI or something similar.

Get a Degree You've got some experience and maybe a certification or two? Good, don't forget your certification instructor's name, it will come in handy for networking.

Now you can start applying for some entry level jobs, and while you're at it, scope out outdoor education and recreation degrees offered around the world. In the US, there are actually quite a lot of options for outdoor education degrees. A simple Google search will do you more good than I can by providing links, so get started looking.

Consider this, however, NOLS (The National Outdoor Leadership School) offers outdoor education and recreation degrees partnered with several colleges that not only offer you a degree, they also offer you expedition experience and certifications.

What!? That's three of my top five ways to land an outdoor job, in one fell stroke. Yup. Check it out.

Network with everyone you meet! Keep lists and add everyone on Facebook (keep your profile professional if you're going to use it for networking).

LinkedIn is a pretty big networking tool, also. You might want to give it a look.

For your most professional references (bosses, managers, instructors) keep a paper file list. You'll need addresses, phone numbers, emails, the usual stuff. When you're mass-applying for that perfect job, you'll thank me.

Don't be afraid to call up these people when looking for job prospects, they might have some helpful leads. Word of mouth is always the most effective way to land a job.

You did build up a professional looking resume to mail out with that job app, and all those hard earned references, right?


Start low when looking for a job. Don't be afraid to throw out apps to any job that interests you, but don't be unrealistic. If you're new to climbing, don't expect to land a job leading multi-pitch expeditions.

Look for internships, and don't think that jobs are "below your skill". You will most likely have to start yourself in the industry by taking low, entry level jobs at first while your network and skills grow.

Looking for outdoor jobs? Check out my list of outdoor job search resources!

Wednesday, March 23, 2011

Running is Good Backpacking Conditioning

I've been very busy ever since returning from hiking in the Red River Gorge and haven't been able to post much other than video and written reviews of gear that I tested on that trip. The next few weeks won't be much better, unfortunately, so stay tuned for new articles when I can get the chance. For now, I'll be doing a quick post about backpacking and hiking training and how running can help you in the long run (no pun intended) on the trail.

Wolverine Terrain Mid Waterproof
Coming up in April I have planned a 12 hour attempt of the 38.5 mile Waterloo-Pinckeny Trail here in Michigan. I have, of course, been training for this extensively over the last month keeping myself on a very regular running schedule. You will see it argued, especially among those who are setting off on the Appalachian Trail, that the only good conditioning for backpacking is backpacking. Thus one school of thought is to simply hit the trail and do short days for the first few weeks while you gain the muscle and conditioning necessary to pump out long days on the trail. There are a few problems with this.

For those of us who are not planning to be doing months of continuous thru hiking, a weekend backpack for an unconditioned body will do nothing more than make one sore and miserable. Even on a long journey, the first few weeks will be slow and miserable. This is why I advocate running as a great training exercise for hiking and backpacking.

Running allows one to adhere to a rhythmic schedule, develop and maintain great cardio, get the legs ready for strenuous use, and keep ones self healthy when you're not on the trail. It allows you to get outdoors to train, running takes minimal time and produces good solid results. You don't need gym memberships or special equipment. It really is a universally achievable conditioning tool to keep hikers and backpackers motivated and fit for the trail.

A lot of people will argue that running doesn't use the same muscles as backpacking. Well here's the real truth: running keeps the legs strong and used to strenuous exercise. While it may take a few days on the trail to develop the trail specific muscles for carrying the pack, the legs and your cardiovascular system will thank you for already being conditioned to running.

Try trail running, it's the same as hiking except you put out a lot more effort and get faster training results.  If you're tight on time, running or trail running will deliver the results you need. You can trail run a few miles a week for a total time of less than two hours a week and get in shape. It would take days of hiking to do the same thing. It's really an economical and time saving solution to trail conditioning.

My Pearl Izumi isoSeek IV WRX Trail Runners
If you're looking for trail running (or any running) shoes, I can whole heartedly recommend our partner Pearl Izumi. I have their Peak XC shoe which is by far the most comfortable and breathable trail running shoe I've ever worn. It has been accompanying me on my recent training runs for the Waterloo-Pinckney Trail. When the weather is wet (often this time of year in Michigan) I rely on Pearl Izumi's IsoSeek IV WRX trail runner. It's a water resistant (just don't stand in the puddles and you'll be fine) shoe that doesn't fit me quite as well as the Peak XC but is still a great shoe. Bear in mind that shoe size and fit will be different for everybody but head on over to Run Like an Animal and look at Pearl Izumi's running shoes for your training.

Pearl Izumi isn't your thing? Try some of Wolverine Footwear's new 2011 trail runners.

Monday, March 14, 2011

How to View Your GPS Tracks in Google Earth

Due to my upcoming 12 hour attempt of the 38.5 mile Waterloo-Pinckney Trail, I have decided to start using my Oregon 400t tracks to analyze my performance. Therefore as I start my training and scouting of the Waterloo-Pinckeny Trail, I will be utilizing GPS tracks in Google Earth. I can then view my trip digitally in "real time", with an elevation versus speed plot. This is all very useful information for me to know as I plan my trail run attempt.

Here is how you can do this for your own GPS logs. I will be writing this from the perspective of a Garmin Oregon 400t and a MacBook Pro. However, it is applicable to anyone.

Step 1. Clear your track before hitting the trail. Here's how on the Oregon 400t 
    Setup -> Tracks -> Reset -> Clear Current Track

Step 2. Set the record interval, the time between each point that your Garmin GPS records on the map. The more often it records a point, the faster your track log will fill up. If you want to record a very long track, set your record interval to "less often" or "least often" if you want a very detailed track, set your record interval to "more often" or "most often".

Step 3. Hike the trail.

Step 4. Save your track on the Garmin GPS unit. If you've followed the directions up till now, you should've started the trail with a clean slate on your track log. To save your track you just walked with a unique name to make it easier to find later, follow these directions:
    Track Manager -> Current Track -> Save Track -> (name your track)

Step 5. Turn on your Garmin GPS unit then plug unit into the computer.

Step 6. Download Google Earth.

Step 7. Open your Garmin GPS unit's drive in Explore (Windows) or Finder (Mac) in my case, the drive mounts as "Garmin".

Step 8. Navigate to Drive "Garmin" -> Folder "Garmin" -> Folder "GPX"

Drive "Garmin"
Folder "Garmin"
Folder "GPX"

Custom name GPX File Located in the "GPX" Folder
Step 9. Your track file will be located in the "GPX" folder where you're currently looking as (customname).gpx as long as you've followed all the directions. Copy this file to your desktop so it's easier to find. If you followed this procedure, go to Step 11.

Step 10. If you didn't clear your track log before hitting the trail it's still possible to recover just the trail segment.

Follow these instructions on your Garmin unit to save your trail hike as a unique track:
     Track Manager -> Current Track -> Save Portion -> Determine which portion was your trail hike      
    by analyzing the date, time, and distance fields -> (name your track)
Now go back to Step 8.

Step 11. Open Google Earth, then select:
    File -> Open -> Desktop -> Customname.gpx
It will ask you some preferences about how Google Earth should import your customname.gpx file, leave the options as they are and hit OK. Google Earth will import your GPX file and covert it to a Google Earth KML file for you.

Now you can view your GPX Garmin track as a Google Earth KML file overlaid on Google maps, it will even "play" it for you and show you exactly where you were hiking, and at what time. You can open the elevation plot by right clicking the track in the "My Places" bar on the left.

Monday, January 31, 2011

Top 10 Beginner Hiking Tips

1. Just do it.
    The largest hurdle in hiking is simply finding the time to break away and go hiking. Set aside a time once a week, or once a day to visit the park or forest.

2. Find a partner.
    Partners can help keep you motivated if you chose wisely. It's also safer to travel the wilderness in pairs.

3. Wear the proper shoes.
    For the beginning hiker, shoes are the most important piece of gear. Don't even think about taking flip-flops. Trail running shoes, ankle supporting boots, and full hiking boots are good. If you're just going to be going out in fair weather not carrying a pack, there's really nothing wrong with a normal pair of tennis shoes.

4. Go somewhere new.
    It gets boring to continually tread the same paths, explore state and national parks as well as local and county parks.

5. Get some exercise.
    Try trail running or cross country skiing if you're looking to get in more of a workout while you're on the trail.

6. Take the dog.
    Take the dog... need I say more? Try one of the awesome Granite Gear Flyers (frisbee) for your beloved four legged friend.


7. Track your progress.
    Share your hiking prowess with others using Endomondo, or Google's My Tracks for your Android smart phone. Track your progress yourself with a GPS, or use a SPOT Satellite Messenger to track and keep you safe. You have to purchase an additional package to track yourself on the trails using SPOT, but it will upload automatically to a web page where family and friends can watch your progress. Find it here.

8. Take a class.
    Most universities have an outdoor club or college. Usually they offer classes such as backpacking 101 and introduction winter sports classes. This would be a good way to get your feet wet so to speak in the outdoor sports and recreation world. Contact your local university to see if they offer community classes in outdoor recreation.

9. Wilderness First Aid.
    The American Red Cross offers Wilderness First Aid classes on a regular basis. Contact your local chapter to sign up for a cheap and lifesaving class.

10. Take it slow at first.
    There's no limit to how far you can go in the outdoor recreation world. But if you've never been hiking before, take it easy at first. Find flat terrain, short trails, and well marked blazes. Read other hiking articles around the net and get out there and try it!

Tuesday, January 18, 2011

How To Make Flamethrower Exhaust - ATV Quad

By reading this you WILL learn how to make your exhaust shoot flames.


I accept no responsibility for any injuries related to replicating my system. This is for instructional purposes only. Do not try this at home. Wink wink... You will learn how to make a flamethrower exhaust using propane and a grill ignitor. A flashback arrestor would be a good addition to this setup, however I opted not to spend the money on it as there are other insurances that the flames won't travel back up the hose (detailed later in this guide). This is by far the most complete and (as far as I can tell) really the only tutorial on how to make a flaming exhaust on the web. I couldn't find any decent practical advice on how to do this, just a bunch of forum threads asking if it's possible. So here's your answer.

Things you will need:


  1. Gas ball valve
  2. 1/4 gas hose ~ 10'
  3. Various Brass Fittings
  4. Mr Heater #F273754 1/4" Male Pipe Thread
  5. Battery Grill Ignitor
  6. Disposable 1lbs propane cylinder
  7. A decent selection of tools
  8. Teflon Thread Tape
  9. Balls.


I bought all of these from the local Menards store, Lowes did not have the disposable cylinder to 1/4" male adapter. I would suggest you buy these parts at your local store since they were much cheaper there than online. I just provided the links so you can see what you need to get. The brass fittings will have to be selected to fit the scenario in which you are working, I got help from a store employee who knew a lot more about brass fittings than I did. I simply told him what I needed to fit where and he took care of the rest. Expect to spend $40-$50. The biggest hitters were the sparker ($16), the gas ball valve ($8), and the cylinder-to-male adapter ($8). 

This isn't going to be the exact same process for everyone, and I have no idea how different exhausts, engines, carburetors, etc will react to this modification. It was a no-brainer for me because the ATV is old and dying anyways and I often perform mad-science experiments on it. Be careful that you don't permanently ruin your vehicle! The hole in the header pipe is irreversible (unless you weld a patch over it) and it may require you to re-jet the more finicky carbeurated engines. If you want to do this to a vehicle such as a car or truck, you'll need a 20lbs propane tank, different adapters, flashback arrestors (so your car doesn't turn into a bomb) and a little sense of adventure/death wish. The general concept here will remain unchanged no matter what you try this mod on. DO NOT TRY THIS WITHOUT THE ENGINE RUNNIG! Having exhaust gasses mixing with and carrying the propane out of the exhaust pipe is vital to prevent the flames from traveling back up into the header pipe and eventually finding their way back to your propane bottle. This could potentially cause an explosion even though propane needs oxygen to burn, and I doubt that it would ignite inside of the tank (oxygen-less environment) but I suggest you don't find out.

I'm not going to explain every tool you will need and exactly where and how to do the drills and cuts. For this reason, if you don't have enough ingenuity to understand what tools and what techniques to use to do this: don't even try it. You'll probably just kill yourself.

Use thread tape on all fittings to prevent leaks of propane gas!!!

How to:

Here's the general concept:

Setup Secured Between Handlebars (black sparker button)
The propane bottle is your fuel source (don't try MAPP gas, it doesn't work very well). The gas ball valve gives you the ability to control when the propane mixes with your exhaust. The ball valve is fitted with a barbed adapter on the out-going end to attach to some 1/4" hose that will run to your header pipe, just in front of the muffler. There, you will drill a hole and insert another brass barb fitting to accept the 1/4" pipe bringing the propane to the exhaust. The propane will mix with the exhaust gasses as they exit the muffler, and be ignited by the electric grill sparker at the exit of the muffler.


Here's the breakdown:

Disposable Cylinder to Male 1/4"

Gas Ball Valve
Brass Barb Fitting to 1/4" Hose
If you've been paying attention then you know that (as the propane gas) our journey now continues into the 1/4" hose. Where does this hose terminate? At the other brass barb fitting that is inserted into the header pipe just before the muffler. Here's the picture of that part.

Header pipe coming from the right, to muffler left. Brass barb clearly visible.
There is the potential here for the exhaust gases to heat up the barb/hose enough to melt the hose. If this become a problem for you, then get braided steel hose, or make a more elaborate joint here to diffuse the heat conduction through the brass.

Now we move on to rigging up the sparker. I suggest you stop at this point and test your rig by lighting with with a sparkler or some constant flame source rigged behind your tailpipe. I used a propane torch duct taped to a 6' stick. Once you know that your exhaust is indeed flammable, then you can proceed to lighting it by spark. Expect a flame two feet high, and a foot or so horizontal to the ground. Check the video to see an example of this rig in action so you have an idea what you're going to be getting yourself into!

You could most likely work this rig with a piezo manual ignitor, but you'd better be able to push that button really fast! The exhaust usually takes a few sparks to catch and you don't want explosive propane fumes building up while you're trying to get it lit. The battery powered models come with the insulated electrodes you'll need to effectively light this baby up and they provide a steady stream of sparks between the electrodes for as long as you hold down the button. The way you work this onto your vehicle is up to you, I can't presume to give you instructions on that. You'll need a little intuition and ingenuity to figure it out.
Sparkers Attached to Expanded Metal Exhaust Modification
Sparkers have a 3/8" Gap as Suggested by Manufacturer

The Battery Sparker is Shaded "Puke" Color, Wires connect it to Electrodes in Muffler
Now all you need to do is test your electrodes, ensure they're insulated from any grounding metal, check that there's a spark jumping between the tips reliably. You could set up the sparkers differently, say by drilling into the muffler right at the end or by welding on a couple of brackets to hold the electrodes at the end. Just be sure that wherever your spark is jumping is where the propane has had a chance to mix with the air to get oxygen. It won't ignite otherwise. So don't drill into the side of the muffler and put your electrodes in there, the propane won't ignite! Notice how my own electrode sit a few inches past the muffler's end? Also watch out that your wires are protected from the flames. That would put a quick end to your adventure.


That's all there is to it. Please comment to ask me any questions you have about making your own propane exhaust. I am not a chemist, I don't work for propane companies, I have no plumbing or gas working experience. Just a pair of balls and a workshop... oh and an old ATV to test things on! I hope you enjoyed this tutorial on how to make your own flamethrower exhaust using propane!

Wednesday, September 8, 2010

Cheap Adventure Travel: Top Five Ways to Save

1. Book Early and Compare Rates:
    If you're flying, book early and compare rates at ALOT of different sites. My personal favorite is Expedia, they're cheaper (in my experience) even than "student booking" sites. Spend some time comparing prices, as this could save you hundreds easily. Your five minutes spend surfing other sites translates into a hundred dollars saved... that's worth it in my book!

2. Get a Student ID:
    If you are a student, hook yourself up with an International Student ID Card. Especially in Europe, these cards are often the key to saving ten percent or more on everything from dining, travel, or lodging. The most common mistake to hamper the success of these cards is forgetting to use them! So always ask if there are student rates available. Even here in the States, a lot of venues and local businesses offer student rates, use these to your advantage!

3. Pack light:
    Using an airline or not, the more you carry the more it will cost. Often airlines will let you take internal frame packs into the passenger compartment as carry on (I've seen people board with 5000 series packs). Road tripping or local travel is always easier and less expensive the lighter you pack. Plus, having only one backpack with all your worldly possessions in it just gives your heart that spirit of adventure!

4. Be Frugal:
    This might seem obvious, but most people fail here the hardest! Decide early on what your budget is. Is your goal to spend nothing at all? Or are you going to be free with your money. Chances are, if you're reading this you'll want to be saving that pocket change! Do you really need that ice cream cone, or how about that souvenir t-shirt? It should go without saying, DO NOT BUY BOTTLED WATER! Find the stuff at a free drinking fountain and fill up your own bottle, people. Don't even think about being frugal if you can't stop yourself from buying the pathetic bottled waters. A good way to practice this is every time you catch yourself eyeballing something, or starting to consider purchasing it just slap yourself. If you don't already have it then chances are you don't need it!

5. Use Free Resources:
    These include but are not limited to local hospitality and friends, a bench in the park for a bed (be careful of the neighborhood), free transportation I.E. freighthopping. Other common online resources to help you plan adventure travel include:

Workaway - A work exchange website for free room and board worldwide.
Couchsurfing - Most of you probably know this one, a website to find a free spot to sleep.

    Monday, September 6, 2010

    Road Trip Adventure: Video Documentary

    Road Trip Adventure: Day Three

        Let's start with a sum of cost from day two:

    • $15 per person for a tank of gas
    • $1 per person for milk
    • $2.50 for subway
    • Day Two Total: $18.50 per person
    • Trip Total Per Person: $39.25
    • Distance Traveled: 445 miles

        Day three of the trip dawned with me having yet another headache. I unzipped the tent and wandered on the beach for a while without shoes which quickly numbed my feet after the 60ยบ night. The single blanket I had brought really didn't keep me warm in the night and I woke up frequently from the cold. I grabbed some tylenol from the car, woke up Jay, and we packed up and left after eating some wild blueberries that were growing in a shrubby patch on the beach.
    Our buddy.
        We drove a long time before finding our morning stop. In a town called Paradise, Michigan we pulled into the gas station. A giant wooden carving of a black bear wearing hunter's clothing and carrying a gun guarded the entrance. We bought some more milk for cereal, and I grabbed a delicious looking honey bun (health snack). We decided that Paradise was not nearly a cool enough setting for us to eat breakfast in so we struck out once again, this time for Whitefish Point. We pulled in to find only one other vehicle in the parking lot, three older men who appeared to be doing much the same thing as us. The two groups politely ignored each other, as people so often do, and Justin and I wandered through the buildings. Finally we settled upon eating our cereal out on the driftwood strewn across the beach. While doing so we discovered, to our great delight, a fluorescent orange salamander, wandering near the lapping waves.
        We played Magic on the pier, and Justin beat me for the 7th or so time. By this time people were beginning to arrive in groves, and the buildings and museums opened up at ten o clock. We walked up to one and asked the attendant if there was anything inside worth seeing. She wasted no time in telling us that we would have to pay to get inside. Apparently she guessed from our dirty, run down, look that we weren't going to pay to get in anywhere. We thanked her for not wasting our time and then walked away remarking to each other how nice it was that someone had just cut to the meat of the issue in a conversation.
        Cereal hadn't been enough so, for the second time, we set up hobo camp in a parking lot (this time Whitefish Point Coast Guard Museum). I grabbed out the skateboards and terrorized all the elderly people visiting the museum by riding in circles in the lot. It was plain to see that they were disgusted by anyone who rode around on those little punk teenager pieces of wood with wheels. The plain instant oatmeal finished cooking and we each had half a cliff bar to go with it. Let me tell you, plain instant oatmeal is the bane of my existence. I've had bad experiences with oatmeal before, once by washing out the pot used to cook it and then heating up the oatmeal-y water and trying to drink it in order to conserve resources. Never do this, as it will force immediate projectile vomiting in all but the most hardened stomaches. Plain instant oatmeal is just one small step below this. So we broke out a can of fruit and dumped it in. It was not the most pleasant experience, but the sugar and flavor of the fruit made the oatmeal bearable, however, I'm not sure I'd do it again if I had the choice. It saved us money, though, and it's really all we had with us for a decent meal at that point. I washed out the pan in the lot while Justin went to the little boy's room.
    Vermillion Station
        Fifty minutes later we pulled in to Vermillion's parking lot. I'm not going to explain this in great detail, as the video will do a much better job for you. However, when we arrived it appeared to us to be nothing short of an abandoned settlement that survived a nuclear apocalypse. Quite the interesting destination, and an adventure well worth the taking! It turned out to be all we had expected and more, because exploring somewhere new, abandoned, and with no one in sight is always exciting. After inspecting the premises, we waded through soggy cranberry bogs to get to the beach. It stretched endlessly both ways with nothing on it but smooth, flat, marvels of Lake Superior rocks. Justin set about building a scale version of Stonehenge while I threw off my flip-flops and looked for cool rocks in the shallows. I ended up returning all my rocks to the water, as I decided that in the spirit of a true adventure, I should take nothing with me. The rocks would most likely get lost, or lose their meaning to me in time. However there, on the beach where they belong, they will last until the final wave breaks them down, for all to see and to be a part of something real. They were just stones, but they were the beach, the open waters needed these rocks. After all, the waves would get bored if they didn't have rocks to polish as they splash ashore.
    Magic at the Falls.
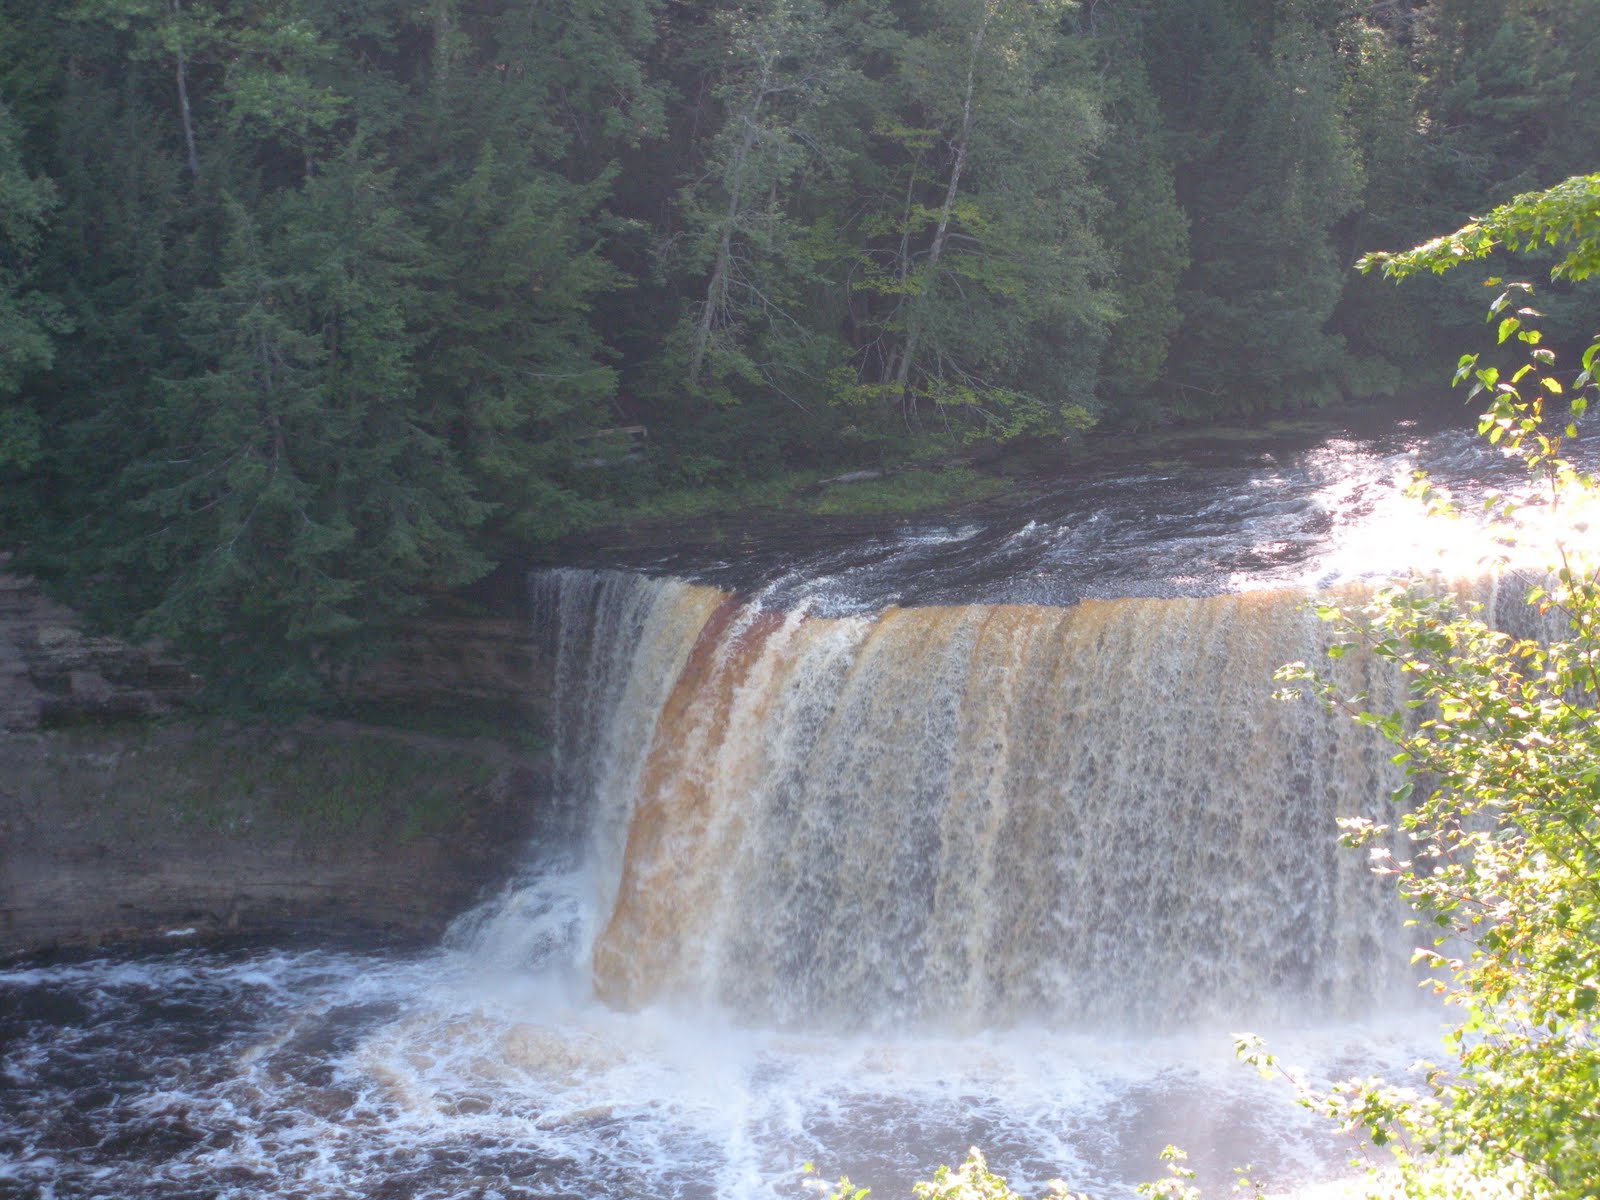
    Tahquamenon Falls (Upper). 
        We fell asleep on the rocks, they were so smooth and flat that they shaped into a perfect bed upon laying down. Some forty five minutes later we headed back and left Vermillion Station (Vermillion Point), the old abandoned Coast Guard Station first established in the late 1800's. We headed out to Tahquamenon Falls, paid to get in (simply because one must pay sometimes), and played Magic on a picnic table overlooking the river for about thirty minutes. We visited the gift shop and once again marveled at the sheer stupidity of all the hordes of identical tourist families. I will tell you, the falls are well worth paying to get in and see, as things like these don't occur very often in Michigan. If you're near them, go and see them. Make sure you spend some time there to really appreciate them, though. Just relax, kill some time, stroll along slowly, stop everywhere there is something to see. It can be hard to find a decent adventure when you're shoulder to shoulder with stereotypical tourist tools, but just follow your heart and do whatever so pleases you and an adventure will be sure to follow.
        We struck out for home... the wrong way! Our travel home started out a little wacky, as we took the road the wrong way and headed west into the U.P. coming out in Newberry. If you look at a map of the U.P. in google, Newberry is one of the only cities to show up at a zoomed out level. One would assume the city would be large, if it's worth showing up when zoomed out. However, this is not the case. Newberry is really nothing more than a large town, however it is quite the cool place. We passed a train stopped at a small "station", and we took a side road down next to it. Parking the car, we decided to walk the tracks and climb the train. This was one of my personal favorite "sub-adventures" during our trip. There's something about the spirit of the tracks and the train that says adventure like nothing else can. Down the tracks a ways we found a railroad refuse pile, and LO! A pile of railroad spikes ten feet in diameter and four feet tall!
    Newberry Train Station.
        We backed the car up Italian Job style, and I jumped out as Jay popped the trunk. I threw in a few buckets of spikes and we "peeled out". Now my old tan car doesn't like to peel out at all, but the tires slipped on the gravel so I think it counts. We took the spikes because both of us are, and know, blacksmiths and these railroad spikes come in handy! Especially in significant quantities as railroad trash.
        We stopped at McDonald's to use their WiFi and try to find an Adult Store. It's been a long running goal of our adventure to find some adult stores to poke around in, just for the hell of it. We found none, however. Try googling adult stores in your area, or at least in Upper Michigan. THERE AREN'T ANY! Oh well. We took our last video documentary, and headed home. In Indian River we both put $10 in the tank, which put us at about 5/8th of a tank. We hoped this would get us home. We arrived around 2 am, Justin drove the whole way for who knows what reason. All in all a great time, 844 miles in three days and countless places visited and sights seen. An adventure well taken!
        Pack light, carry what you need, don't indulge yourself, and find your own adventures where it doesn't cost $3 for a day parking pass. There are plenty of good times just waiting to be had off the beaten path but you'll never find them unless you force yourself to break the mold. Take a different kind of trip next time you go. (HINT: more people means less per person on everything!) Make your own adventures!


    • $1.50 each for milk and honey bun
    • $1.75 each for parking pass into Tahquamenon
    • $1.50 each for four Vaults
    • $1.75 each to cross the Mac
    • $10 each for gas
    • Advenure: Priceless
    • Day Three Total: $16.50 per person
    • Trip Total: $55.75 per person